OverviewEnemies: Bitesize, Chomps Jr., SquidgeBonus Rooms: 0 Animal Buddies: Enguarde Difficulty: Hard  The Stage The StagePoison pond is polluted and filled with poisonous (toxic) substances, but it's a good thing that our monkey heroes are immune to it, and can swim the stage as if they wear protective suits or else.. say good bye to those furs! This is the only underwater level in the game that has a green foggy background, that is of course, because of those toxic wastes that the slimy Kremlings had dumped into the water. You can't get harmed by the pollutants, but there are plenty of dangers here that can be worse than those things. There are unfriendly inhabitants here that doesn't like your presence, but to top that, the Kremlings had also set their machine traps to mince you, yes, the mincers are here, and they are pretty dangerous. You can often lose a monkey because of these suckers. GuideRight at the beginning, head left while crawling on the bottom floor to swim through what seems to be an illusion wall. Enguarde's waiting for you at the other side. When you come out from the secret room, swim directly upwards until you get the "K" letter hidden in a lonely corner. Now, you swim right pass three Bitesizes. Keep heading right to enter a corner guarded by a Chomps Jr., there's a banana bunch at the dead end. After retrieving your precious bananas, go up into the vertical shaft. When you arrive on top, you'll easily spot a path on the upper left corner. Another banana bunch can be found at the very end of it, but, while it may seem like no one's guarding it, be prepared for a sudden attack from a Chomps Jr. that will come out from the left wall. Another Chomps Jr. from the right may also join in, so fight your way through. After your short battle, move out of that corner. Head right, and you'll encounter a Mincer that moves up and down. You can pass this one easily, but don't attack it or it'll grind your animal buddy's nose. After the Mincer, a Squidge may swim on your path so be alert. Your next obstacle is a double Mincer that also moves on your path. Just follow the banana trail to pass this one. Now, you are put into another vertical shaft, but before that, you may want to grab that banana bunch in the corner. You have to be quick to get it though or the fast moving mincer will grind you into fine sheets. Using Enguarde's charge when the mincer is away usually does the trick as it allows you to jet forward. Once you grab the bananas, go up the vertical pathway and watch out for the bitesize above. A Mincer follows, this time, moving on a horizontal plane. Just rise quickly to pass it. Then, be prepared to pass another one. Above, a bitesize may suddenly appear so stay alert. From the vertical shaft, head left to find two Squidges, and then a stationary mincer. Do not rush to pass it as another mincer patrols over it. Wait for the top mincer to pass then pass the stationary one. Proceed to hug the bottom wall and head to the left to find another stationary mincer. Wait for the moving mincer to pass again before passing that other stationary one, then move cautiously through the pathway as there are bitesizes coming your way. Following them, are two Mincers found in the next area. These two move in a horizontal plane, but they move in opposite direction to one another. So, to pass them, pass in between them. After passing the mincers, watch out for the Squidges. Grab the "O" as you ascend the vertical tunnel. Above, you are greeted by more squidges, and after that, another mincer blocks your path. To pass it, move through the tunnel when it's away. The Star Barrel is up ahead.  Destroy the Halfway Barrel and proceed right. There's a Mincer along the way that comes out from a hole in the ground. In that same hole, a banana bunch can be found. Move into the hole to get the item and stay low, the Mincer won't touch you, wait for it to rise then quickly get out of that place. There's another Mincer up ahead that also moves into the hole, there's also a banana bunch in that hole. Use the same trick to get the banana bunch. However, getting out of there is a little bit harder compared to the last one. When you go out, prepare for a greeting from a Bitesize. Now, instead of following the trail of bananas, you should check the right corner area. The path leading below leads to an area guarded by Mincers, while the straight path to the right pits you directly against Chomps Jr.. The two paths mentioned actually leads to one and the same secret area, but if you don't have Enguarde, it's more likely that you will have to take the lower path (with the Mincers) to reach the area. There's an Enguarde Crate in there. However, if you already have Enguarde, just follow the banana trail. Above, a Mincer patrols your path. When, it's away (at the far left), head right and prepare to meet 2 more of those bitesizes. You would normally pass in between them, but if they are in your way, don't hesitate to prick them with Enguarde's nose. There's a DK barrel in this room, found at the bottom right, bust it open if you need a kong, otherwise, head upwards into the upper path but as always - do not rush! (The golden rule of this stage). There are three Mincers in the next room and they are moving in a circling pattern. Swim to the center of their circle. Now, check the roof of the room, there's a depreciated portion if you've noticed. Move into that portion to discover that it's actually one of those faker walls. Move upwards into a secret room where you'll find a Rambi Token. Now, move back into the center of the circling Mincers and head to the right, then immediately proceed to the lower corner. If you don't, a Mincer will surely dismount you from Enguarde. Wait for the Mincer to pass then move into the upper corner with the "N". Wait for the Mincer to pass again before moving out. The next area has another set of those circling Mincers, get into the center just as you did with the first, and head to the middle portion of the left wall. You'll pass through the wall and into a secret area with the Expresso Token. There's a launcher barrel at the end, which will launch you outside. Outside, wait for the Mincers to come out, and when it does, race to the top, and turn towards the trail of bananas.  In the next area, you will be pitted against a swarm of bitesizes. Some of these denizens move at fast speeds that even with Enguarde, it's still hard to pass them unharmed. The "G" letter can be found along the way and the exit, just up ahead. You should also watch out of the Mincers near the exit.
Quick OverviewLocation: Elevator AnticsItems: 50 Bananas Walkthrough: Ride the last elevator near the exit of the level to find the bonus cave entrance below.  You can actually score all the bananas in this room if you adjust your trajectory and falling pattern so that you can fall back into the cannon barrel.
Quick OverviewLocation: Elevator AnticsItems: 4 Bananas, "O" Kong Letter, Expresso Token, Green Balloon Walkthrough: The entrance is on the ceiling of the cave, which can be found before the Star Barrel, and in an area with three ropes guarded by yellow Zingers. Use the third rope to reach the ceiling.  Use the Cannon Barrels to cross to the other end of the level. The barrel rotates when you enter it and you have to time your blast to make it to the next barrel. Be warned, each barrel has different speeds and it becomes harder as you go farther.
Quick OverviewLocation: Elevator AnticsItems: Red Balloon Walkthrough: Climb the first rope you'll find in the level to get to the bonus room entrance. Do an aerial roll/cartwheel + jump to reach the rope.  The rules of this bonus room is easy to understand. Just spell the word "KONG" to get a Red Balloon.
OverviewEnemies: Klump, Mini-Necky, Slippa, ZingerBonus Rooms: 3 ( 51, 52, and 53) Animal Buddies: None Difficulty: Average 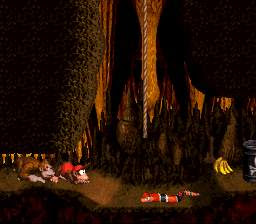 The Stage The StageThis cave level has a new installment in it - Elevators (Use for mining purposes). While it's fun to ride elevators, falling off of it could be sad. You also get to encounter a Slippa-spawning drum and some unfriendly denizens. The level difficulty isn't that pretty tough, but it could be sort of above-average for beginners who are not aware of the traps set forth by this stage. GuideStart off by roll jumping to grab the rope near the top of the screen, climb it, and enter Bonus Room #51! Yeah, this bonus room's easy to find. You will land right by the high cliff of the entrance, so head right, kill the two Slippas, and then climb the next hanging rope. Jump from rope to rope to get the "K". Take out the Mini-Necky, and the Slippa before jumping to the lower platform, where another Slippa awaits. Now crawl through the narrow tunnel, and roll attack the two Slippas before you crawl through another narrow tunnel. Quickly jump onto the rope, and climb upwards to where you can jump onto the Mini-Necky. Now you can bust the DK Barrel if you need to, and head over to the ropes. Just watch out of the Slippa-spawning drum. It'll cease spawning enemies when you're very close to it so do make contact with it to make it stop. Jump across the ropes when the Zinger is low on the middle rope, and fall down from the last rope to fall directly into a platform where you will be killing a Slippa. Crawl through the three narrow tunnels, and be sure to time in between the Zingers that patrol. Now jump onto the rope. There's a patrolling Zinger on top of it so be careful not to climb very high. The second rope also has a patrolling Zinger, but it patrols at low altitude. When the bee on your rope goes down, so does the bee on the second rope. Note of this pattern as you need it to cross between ropes. To cross, wait for the bee on your rope to go up, climb up when he does then transfer to the second rope before he returns to sting you. Now, while on the 2nd rope, go up and wait for the bee on the third rope to descent then immediately transfer to the third rope and onto the top of the ceiling. It may not be visible but a bonus barrel can be found there if you head right. Get the "O" letter from the bonus room.  From the hidden level, you land on a Mini-Necky. Head right to hit the Star Barrel. You would be better served here to play as Donkey Kong because of the heavy hitters you will soon face. A Klump will greet you on the lower platform, and after that, you get to ride the elevator going down. There's a banana bunch on an island near the bottom of the pit. Grab the banana and ride the elevator going up. There's a Metal Keg on the next platform. Grab the keg, and use it on the Mini-Necky that will accost you. Then, ride the elevator going down again. This time look to the left. The "N" kong letter can be found on a short ledge. Now jump across the elevators, and then take out the two Klumps you find on the next platform. Use the Metal Keg to clear away the Zinger, and then head up the elevator to get off and kill the two Klumps. Jump down to the lower ledge, and then head across the elevators. Time your jump to avoid the nasty Zingers. On the next platform, Klumps may hamper your way. Well, just make them fall dead. The next set of elevators have Zingers flying on top and that's where the elevators are leading you into. You can avoid them by rolling/cartwheeling under them, but make sure there's another elevator to catch you or you will be rolling/cartwheeling to your doom. Do the same trick on the third elevator. The next platform has another Mini-Necky, get rid of it and prepare to cross an elevator guarded by a stinging Zinger. Note the pattern of his movements and avoid him while getting into the elevator platform. The next platform has "G" guarded by one of those pesky Mini-Neckies, this is followed by another elevator ride. At the end of the ride, is a Zinger hovering steadily on a platform. You can avoid him by jumping on the clear ground. Ride the next elevator and prepare to do an aerial roll/cartwheel at the bottom so you could transfer on the next elevator without touching the guarding bee. Your next obstacle above will be a Mini-Necky who tries hard to put you down. Put a rest to his effort and give him a break, but to do that, you need to time your bounce on the tire and pass his barrage of nuts. Otherwise, your monkey will be looking for a place to go, or worst, he could be seeing stars! After that feat with the mini-bird, ride down the last elevator. It'll lead you a hidden ledge where a hidden cave entrance can be found ( Bonus Room 53).  When you fall back, you may exit the level or reenter the Bonus Room. The Bonus Room will be refreshed with bananas and since the bonus entrance is not a barrel, you can keep on entering it.
Quick OverviewLocation: Trick Track TrekItems: Red Balloon, Green Balloon, Blue Balloon Walkthrough: Pounder the last Manky Kong near the exit, and jump down below from his location. There's a hidden platform below that should catch you. There, you'll also find the barrel that will send you to the bonus room.  This is not different from the previous bonus rooms in DKC (ie. Bonus Room 39). You can claim one of the items in the barrels by matching all three similar items. Go for the Blue Balloon for a 3 lives up.
Quick OverviewLocation: Trick Track TrekItems: 55 Bananas, Red Balloon Walkthrough: Can be found after the Star Barrel. As you trek the road using the mechanized platform, you'll come across two Gnawties on a single platform. You have to reach their platform and steal it from them. From this platform, get into the bonus barrel up ahead.  This is similar to a few bonus rooms in the game. However, this Klaptrap knows how to jump. Note that it jumps when you jump so you better watch out. Every stomp you give it will make it spit a banana bunch and at the same time increase its speed, this could also make it leap farther when it jumps. Stomp it a couple of times to bring it down.
Quick OverviewLocation: Trick Track TrekItems: 60 Bananas Walkthrough: At the end of the first mechanized platform's track. While at the mechanized platform, do an aerial roll and jump to the right to reach a cannon barrel underneath the hanging platform.  Ride the machine to tour you around the bonus level. Collect the bananas as you take the ride.
OverviewEnemies: Gnawty, Klaptrap, Klump, Kritter, Krusha, Manky Kong, Mini-Necky, Necky, ZingerBonus Rooms: 3 ( 48, 49, and 50) Animal Buddies: None Difficulty: Hard  The Stage The StageAnother one of those top of the mine shaft levels, but this one plays differently. Almost all throughout the stage, you will be riding a mechanized platform through a series of dangerous plights. This is one of the hard stages since Snow Barrel Blast. GuideRun to the right at the start, avoiding Necky's debris, and jump onto the mechanized platform that sits waiting for you. It will move immediately upon touching it. Now, get ready to take out the Necky, and break the DK Barrel. After a little bit of a ride, a Necky will be in your travel path, so bust him up. Next, you'll meet a Necky that you can use as a stepping stone to reach a Banana bunch. Then, the next thing you'll see is a "K" that's protected by a nut-chucking Necky. Just jump to the "K" between the shots. Now you'll encounter a Necky that flies horizontally above you, so jump up when you have a good shot at killing it. On the next obstacle, if Donkey Kong's on the lead, use his Ground Slap to kill the Neckies as you near them, otherwise, you'll have to jump on them. At the bottom, watch out for a Necky that's coming your way. The track leading up has a DK Barrel at the end, hit it to get a Kong back (if you need one), and then jump between the two Neckies charging at you. Now the track will start leading down, watch out for another one coming up. After that, you'll encounter a Mini-Necky that'll spit at you, so hop his shots till you are near enough to put him down. Three Neckies are coming up, so prepare to bounce off of them to get to the "O" high above the track. Now you go up the track, and be sure to avoid the mini-Necky shots. Next you have to take out the two Mini-Neckies on the way down, and then finally, you reach the end of this track, where you will now roll jump under the platform to get to Bonus Room #48! 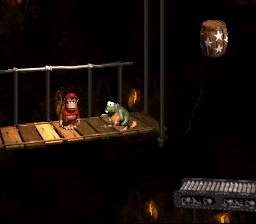 Take out the Gnawty after you land, and then bust the Star Barrel as you jump onto the next mechanized platform. A Gnawty will attack from a platform above, and then you will have to jump over a Zinger and get the DK Barrel in the process. Two more Gnawties will attack from above, followed by a pesky Mini-Necky blocking your way, and another Zinger that patrols your way. Now, when the track reaches the point where it'll start going down, use your aerial roll jump to reach a platform with two Gnawties. Waste the beavers, and then jump into the Launcher Barrel to access Bonus Room #49! You land right back at the start of the second track again. So, just repeat the same tactics until you reach the last part where we left off. When you reach the same section, prepare to meet a Kritter whose going to dive at you. Next, a Klump will come down to play, so play with him by crushing him with DK's weight or throw him off with Diddy's Cartwheel, and then bust the DK Barrel open if you need to. Next up, a Mini-Necky will challenge you, followed by another Klump, and a Necky that chucks nuts to guard the "N". A Klaptrap will try to get you from above is next, and then you'll meet a Zinger that's circling around the "G", just time your jump to get it. Two Klaptraps will dive-bomb you next, and then a Manky Kong will attempt to dent your head, so dodge the barrels if you don't want to get a lump on the head. Next you'll face a horizontal flying Zinger. Evade it by jumping over it. Finally, a Krusha will attempt to get you. You can knock him out with Donkey's jump, however, if you are Diddy Kong, you have to stay on the left side of the platform to avoid him. Don't fight him if you're Diddy or you'll get thrown off from the platform.  You have finished your trek, so jump onto the hanging platform, dodge oncoming barrels, and roll through the Manky Kong. From the Manky Kong's recent location, go down. There's a platform below which you can use to get to Bonus Room #50! Just exit the level once you return to the stage.
Quick OverviewLocation: Oil Drum AlleyItems: 16 Bananas, "N" Kong Letter Walkthrough: Can be found after the Star Barrel. You can find a Manky Kong guarding a barrel along the way. Carry the barrel to the right until you see an area with a floating drum in the air. Break the barrel onto the right wall below that drum.  Ride the Cannon Barrels to bring you to the exit of the level while collecting the items along the way. The "N" Kong Letter can be found near the exit.
Quick OverviewLocation: Oil Drum AlleyItems: Red Balloon, Green Balloon, Blue Balloon Walkthrough: While in Bonus Room 45, go for the single banana prize by matching three single bananas in the three barrels. This will give you a barrel. Use the barrel on the right wall, but you have to jump towards it, otherwise the wall will break but the kongs won't enter it.  Another one of those "hit the blinking letter" game. The first word spells "DONKEY", this will reward you with a beautiful Red Balloon. The second word spells "KONG", your prize here is a gorgeous Green Balloon. The final word that you have to spell is "COUNTRY", this one will earn you a magnificent Blue Balloon. Overall, you can collect a whooping 6 lives in this bonus room.
Quick OverviewLocation: Oil Drum AlleyItems: Barrel, Banana Bunch, Winky Token, Red Balloon Walkthrough: Climb the steps with Gnawties guarding each step. Then, while on top of the platform, jump down onto a metallic patch on the ground below to reveal a TNT Barrel. Use this TNT to blast the wall to the right. 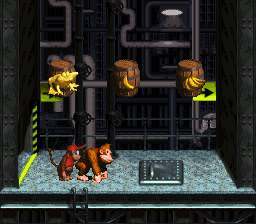 You can collect one of the four displayed items on the barrel. All you have to do is matched all similar items. However, if you want to get into Bonus Room 46, you need to match all three single bananas. This will give you a barrel. Hold the barrel, then jump towards the right wall to enter the bonus room.
Quick OverviewLocation: Oil Drum AlleyItems: 50 Bananas, 1 Red Balloon Walkthrough: From the start, bounce off Gnawty while he's on the platform to reach the rope found on top of the screen. Use the rope to break the patch found on the ground to get the TNT Barrel. Finally, use the barrel to destroy the first drum you'll come in contact with. Jump into the hole.  It's not unlike the few bonus rooms you have been into in the game. You start inside a rotating barrel cannon, awaiting for your "fire" command. You can actually collect all 50 bananas in this room, but you have to determine where the barrel is below so that you can land back in it. Blast out of the barrel when it is pointing up and is in the middle of the bonus level to collect the red balloon.
OverviewEnemies: Gnawty, Kritter, Manky KongBonus Rooms: 4 ( 44, 45, 46, and 47) Animal Buddies: Rambi Difficulty: Average  The Stage The StageThis event takes place in a Kremling factory, those nasty lowlifes have engaged into the oil slick business and have set some drums ablaze just to stop you. Personally, we love the background music more than anything else in this level. All you see around here is dirt everywhere, which surely reflects the Kremling's lack of sanitary control. They should be living in a swamp, wait a minute, they did came from the swamp. Ah, it figures! This stage has one of the game's most hidden secret rooms, do you think you can find em' without our help? GuideAt the start, go right, bounce on the Gnawty while he's still on the platform to reach the rope up on top of the screen. Once you cling on it, it'll move to the left, so take a ride buddy. When you reach the rope's final destination, jump off of it and onto the metal plate patch below on the ground to break it open and reveal a TNT Barrel. Pick that barrel up, head right, and destroy the first Drum you come in contact with. Jump into the hole to find Bonus Room #44! You come out to face two Kritters, and right after them is a DK Barrel to replace your missing Kong if he is missing. Jump over the Drum, and kill another two Kritters who approach you. Grab the "K" as you jump over the gap, and then use the tire to get over the Drum. Next, you see three steps, and each one has a Gnawty on it, so take care of them, and then jump down to the lower ground where a metal plate waits to be busted. It'll reveal a TNT Barrel. Use this on the wall to the left to reveal Bonus Room #45! While in the bonus room, go for the single Banana prize, which you can get by matching all the single banana icons in the barrels. Instead of a single banana, you'll get a barrel. Pick it up, run and jump towards the right wall to enter Bonus Room #46! Tricky Bonus Room, isn't it? You will land onto a Tire. Use the tires here to bounce your way across the drums. The next area that will put your jumping skills to the test is an area with steps going down, with Drums and Gnawty acting as hurdles. Jump down on a Gnawty, bounce off of it pass the drum and onto the next Gnawty, and then onto the metal plate below to reveal a DK Barrel. Next, take out the Kritter, jump into the Launcher Barrel, and bust the metal plate to reveal a free rolling tire. Bring the tire along as you kill off various Kritters along the way. Use it to reach the "O", or, if you left it behind, just use a Kritter to bounce up unto it.  Next, hit the Star Barrel, and go on top of the Drum on the elevated platform, but becareful of the flame coming out of it. Wait for the flame to dissipate, then get on top, and jump onto the metal plate patch to reveal the DK Barrel. Now, jump into the hole. Surprisingly, your buddy Rambi is in there, now go and teach the Manky Kong a lesson. You can charge at him even with the barrels hurled at you, providing that the barrel hits the horn and not the body. At the edge, wait for the Drum flame to die down, then make a crossover. Next, kill the two Kritters that challenge you. Kill the Manky Kong found on top of a platform. If your rhino friend is still with you, charge at the right wall found at the bottom of a floating drum. Otherwise, grab the Steel Rimmed Barrel, throw it, and follow it till it breaks open Bonus Room #47! Be sure to grab the "N" from the Bonus Room! 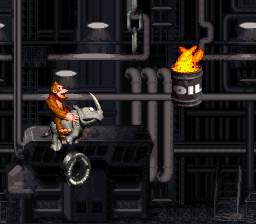 You fall down by the gap with a drum stepping stone. There's a banana bunch to the left, but you'll have to eliminate the competing Manky Kongs first. To the right is the floating drum, wait for the flame to disappear, and make your way across, but watch out for the Kritter on the next platform. While on the Kritter's platform, make a big leap to cross over the gap and the drum. Now, you'll have to cross over the next gap using the two drums. You'll have to move fast here, or the flames will torch your butt. The next platform have two Kritters on it. After that, you'll have to cross the gap using another drum. On the next platform, make a charge at the Manky Kong if you have Rambi, otherwise, dodge the Manky Kong's barrels till you have the opportunity to rid yourself of that nuisance. Now you are at the Drum stepping stone part. The Drums have a unique lighting pattern, so observe its behavior. Note when the flames stay longer, when it goes down, that's the time you make the crossing. Stay on the floating tire every time you reach one, there, plan your next move. And by the way, the drum at the very end has a different lighting pattern too, so do watch out! Once you reach the solid ground, stand on the Drum when it is not burning and jump off to hit the metal plate below to reveal the "G" buried in there. Then make your way to the exit.
Overview:Kremkroc Industries Inc. is also difficult because of the fact that it offers plenty of traps, obstacles, and ambushes. You may also notice that its stages looks technologically advance, and polluted. Well, that certainly reflects the Kremling's dirty personality.  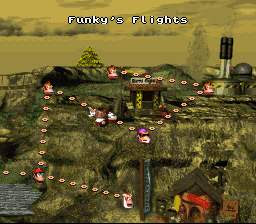
OverviewEnemies: Really GnawtyBonus Rooms: 0 Animal Buddies: None Difficulty: Average 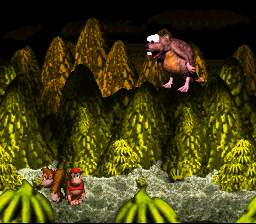 The Stage The StageCongratulations, you've made it into Banana Mountain. You can find Very Gnawty's brother here, whose naughtier than he is. He attacks like Very Gnawty, however, he has some new tricks up his sleeve. He starts with the same hopping attack similar to his predecessor. Jump onto him. He will register a chuckle, and attack with a high jump to crush you. He will then follow this with a longer hop. Kick him on the head again, and he'll attack with two high jumps, and a more longer hop. Hit him again, and he'll improve his attack to three high jumps followed by improved hops. Jump onto him again, and he'll quadruple his high jumps, and perform a much longer hop that supersedes that of his brother. Stomp him for the last time, and he'll cough and fall. Well done! You've cleared World 4! However, if you think that reclaiming your bananas would be a cakewalk, think again! You'll face an elevated challenge from World 5.
Quick OverviewLocation: Rope Bridge RumbleItems: Enguarde Token, Winky Token, Rambi Token, Expresso Token Walkthrough: Right after the "G" Kong Letter. In the area with moving islands, you can find a single banana flying on top of the screen. Bounce on the tire to reach it and get into the hidden barrel.  You can get only one of the four animal tokens that are appearing inside the barrels. To pick the item, touch the barrel when it comes out. Match three of the same item to get it.
Quick OverviewLocation: Rope Bridge RumbleItems: 45 Bananas, Winky Animal Crate Walkthrough: In the second pit from the start of the level. Jump at the center of the pit, you won't miss the rim of the barrel that way.  Just jump across the level using the tires while grabbing the bananas in the air. Winky's container is waiting for you at the exit.
OverviewEnemies: Army, Kritter, ZingerBonus Rooms: 2 ( 42 and 43) Animal Buddies: Winky Difficulty: Average  The Stage The StageAn icy version of the tree top town. The trees as you can see are covered with snow, fortunately, it's not slippery like the previous ice covered stages. Here, your tire bouncing skill will be put to the test. Are you ready? GuideGrab the DK Barrel to start, and head right towards a Kritter, use the barrel if you wish. Now, when you arrive at the spot with a gap and two stationary tires on each edge, jump into the gap and make sure you land correctly in the center, in between the edges. There's a secret barrel in there, which will catapult you into Bonus Room #42! Be sure to grab Winky in this Bonus Room. This will make your task easier. When you return, use Winky to kill the Zinger guarding the "K". Next, jump onto the platform, move on, jump onto the Zinger to knock it off. Head right and knock another Zinger that's circling the grounded Tire, and land on the next platform. Kill or avoid the next enemy, and then use the grounded Tire to get to the high platform. Jump and bounce off on the next Zinger, and then cross over the gap into the next platform. Use the four grounded Tires to bounce your way across, but do watch out for the Zingers guarding some of it. Continue to the right and you'll find the Star Barrel.  Kill the Kritter, and use an aerial roll jump to get the "O", of course, you will need to get off Winky to do so. Next up, use the grounded Tire to get to the moving platform, and collect the Bananas in the air. After that, continue on your progress. Jump onto the Kritters to clear the spot. Do an aerial roll jump to get the floating banana bunch. Now, move on and get onto another moving platform and use the tire on it to get the "N" kong letter. Go to the next edge, and jump onto the moving platform with a Tire, and time you jumps to clear a Zinger before you can get to the small stationary land with a DK Barrel on it. Now you have to use another moving platform with a Tire on it to get past two Zingers. Fortunately, with Winky's help, these Zingers can be put out of commission so they cannot bother you. Now, move onto the next platform. Dispose of the naughty Kritters along the way, and use the aerial roll jump trick to get the "G" from the gap. Now, move forward to enter another area with moving platforms. On the second moving platform, use the tire on it to bounce into the single banana in the air that can be found along the way. It marks Bonus Room #43!  When you come out, you'll fall onto the tree with an Army. Dispose this lowlife. Use the moving platform with the Tire on it to clear three Zingers piled on top of one another, or, with Winky, you can stomp them like cockroaches. Then, all you need to do is exit the stage.
Quick OverviewLocation: Torchlight TroubleItems: 55 Bananas, Rambi Token, "G" Kong Letter Walkthrough: Near the exit of the stage. You need to bring a barrel to break a wall and you need to pass the final mincer to do this. 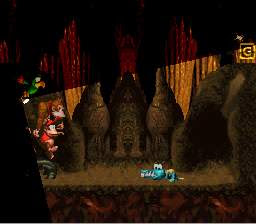 Torchlight Trouble Torchlight Trouble version of the Klaptrap prison cell, meaning, you're with Klaptrap while Squawks is with you. This room is where you can find the final "G" Kong Letter of the level. Step on the Klaptrap to make him spit bananas. Like the previous bonus rooms similar to this one, Klaptrap will increase in speed every time you squish him. Step on him a couple of times to make the Rambi Token appear.
Quick OverviewLocation: Torchlight TroubleItems: Banana, Banana Bunch, Red Balloon Walkthrough: Right after the Continue/Star Barrel, crawl pass the rocky structure, and you'll be in an area with a steel-rimmed barrel. Carry the barrel, go down, and smash it on the wall.  It's similar to the few bonus rooms in Donkey Kong Country. This is a match the item in the barrel game. To score the item, match all three similar items and tada.. the item is yours. You can score only one of the three items though. Choose the Red Balloon for an extra life.
OverviewEnemies: Klump, KrushaBonus Rooms: 2 ( 40 and 41) Animal Buddies: Squawks Difficulty: Average  The Stage The StageThis is a cave level, but unlike any cave level, this one is dark. And, if not for your animal buddy, Squawks, who's here to help light up your way, this level could have been one of the hardest. In addition to the hazards presented by the denizens, there are two new obstacles that you should pass alive, the Oil Drums, and the Mincers. The Mincer is a wheel of death that could really mince poor Diddy and Donkey, while the Oil Drum could toast your butt if you're not careful. GuideYou enter a dark cave, the first thing you should do is hit the DK Barrel, and then bust Squawk's container to release your feathery friend who will provide you with light. Then, move forward and roll at Klump to put him off balance. Next, jump over the flaming Drum, and when you land, roll at another Klump, and perform an Aerial roll jump to get the "K" landing back to the land mass. Jump over the Oil Drum and then the gap, roll under Klump, and then hop across the Drums to land on a moving land piece. Grab the "O", jump onto the next platform, and rid yourself of Klump. Jump onto the vertical moving platform when it is at low position. Then, to transfer to the next ground and pass the Oil Drum, choose to jump when the platform you're on is at high position, after that, do an aerial roll jump over the burning drum, but watch out for another Klump, and do remember that you can't beat him with a jump attack if you're Diddy. To make another transfer to another floating platform, do the same trick as you did the last, but becareful, as this one's slightly faster. Just jump over the drum and onto the platform while it's on its way down to time it right. Your next object is to pass the drum and transfer onto another ground. You can do it with the same aerial trick that you pulled out in the previous ones. Now, you have to leap over two Oil Drums while crossing the gap. Switch to Diddy to make it through easier. Hit the Star Barrel to save your midway progress.  Crawl through the narrow tunnel, and hit the DK Barrel as you go through. Grab the Steel Rimmed Barrel, and fall back down to bust open the wall to Bonus Room #40! You come out in between two Mincers, and you must head right and face a Krusha, so have DK lead the way so that you could dispose Krusha with a jump attack. Follow the banana trail to get onto the higher ground. Up there, prepare to face two Krushas, followed by a leap to an island with two Mincers at both ends. You should also know that a Krusha guards that island as well. So switch to DK, do an aerial roll jump to pass the Mincer, then crush Krusha with DK's crushing weight. Now, jump over another Mincer to get onto the next platform, well, this is easy said than done. You need to gain enough velocity to cross it unharmed, and it's best to use Diddy too. Your next move is to leap over the Mincer and onto the moving platform. Note that the platform is slow. Make sure that it's low enough before you jump onto the platform. Then, use an aerial roll jump off of this platform to get the "N".  Next you have to jump between two Mincers, and kill a Krusha. Pick up the Steel Rimmed Barrel and go right, then jump over a moving Mincer. Of course, you need to make sure that the Mincer is at low point before jumping over. When you land at the bottom, use the barrel on the left wall to enter Bonus Room #41! The "G" is inside the Bonus room, it's hidden in the right corner. Bounce off the Klaptrap to get it. When you arrive back in the main level, just go to the exit. But, before that, hit the Exit Sign with DK's slap. You'll find something nice.
 Quick OverviewType: Quick OverviewType: Squid Immunities: None Squidge is a cross between a jellyfish and a squid, strangely enough, it looks like a frog too. It swims the submerged levels of Donkey Kong Country in a zigzag fashion. Like any other underwater creature in DKC, your kongs can't harm them without the aid of Enguarde the Swordfish.
OverviewEnemies: Chomps, Chomps Jr., Croctopus (Blue), SquidgeBonus Rooms: 0 Animal Buddies: Enguarde Difficulty: Average  The Stage The StageThis is the stage in DKC where you'll encounter the only chasing Croctopus of the game -The Blue specie. These Croctopi can't be beaten even with the aid of your Swordfish buddy, so you have no other choice but to get away from it. It also looks like this swimming level is different from the last swimming levels, for it have blue corals, hmm.. it must have reflected the cold condition of these waters. That may be, fortunately, your monkey is immune to hypothermia. GuideThe stage introduces you to a squidge first hand. This annoying squid floats around these cold waters. They are slow but they can give you an equal amount of nuisance as would those upcoming Croctopi. Speaking of Croctopi, one of them is just up ahead. This croctopus will give chase as soon as you move ahead of him, so save your monkey fur and swim for your life. It'll reside in the first hole you'll find along the way. You made it? Good, that was just a practice run. Now, head to the DK barrel and bust it if you need a kong. Now, swim to the right, and watch out for a squidge. The next Croctopus chase is about to begin, and it'll start as soon as you go ahead of it, same as the usual. Move to the vertical shaft while swimming as fast as you can (Check this guide's Advance Kontrol Tactics on how to swim fast). Grab the banana bunch in the corner found along the way and vacate the spot immediately as the chasing Croctopus will rest on that very corner. Move down into another vertical shaft. And, as you descend on this shaft, watch out for another squidge, who would like to have a collision with you. There's another Croctopus again, swim towards the next vertical shaft quickly, grab the "K" along the way, and head left at the turn of the road, as the Croctopus will reside on the top corner. Move further to the left, and get into the trail of bananas to avoid a nasty surprise from Chomps Jr. The next Croctopus chase will be a longer one. In additional to the chase, a single squidge will attempt to block your escape by getting in the way. Avoid it, but whatever happens, don't stop. Just swim as fast as you can, and avoid the corner found along the way, as this corner is the Croctopus' home sweet home. Now, enter the Launcher Barrels to move into the next area. At the bottom, where the Cannon Barrel sends you, swim right and press the wall to pass through. There's a DK Barrel inside and an "O" if you follow to the end of the secret path. Go back into the Barrel Cannon thereafter. The next area has an incoming shark, move down the chamber to stay clear. Next is another Croctopus chase. The road ahead is a vertical zigzag, just make sure you follow the banana trail found at the end of this path. You made it into the Star Barrel, way to go chimp! The next Croctopus chase challenge is short but tricky. Just head upwards to the DK Barrel at the turn of the road. The next Croctopus will chase you all the way up, so make sure that you swim fast and turn right near the end of the road. Watch out now, a Chomps is on his way to chomp you. Move down quickly into the next vertical shaft. Below, another Croctopus awaits you. Turn upwards at the intersection coming up ahead, then follow the slimy enemy into the frog token. The Croctopus will most likely disappear out of sight, so now, you'll have an easy time going up.  Up above, you're on a collision course with a shark, avoid the shark and get into the Launcher Barrels. The next area has a shark patrolling the upper field, you'll have to move down the chamber to avoid it. Now, get out of the area and move into the top corner to avoid another chomps' menacing bite. Stay in there until it clears the way, then move on. Another Croctopus greets you hello. Move ahead to start another chase, this time, downwards in a ladder type path. The Croctopus will reside in the corner found along the way. Now, be careful of the next area, follow the banana trail and avoid the upper and lower extremes. Move straight into the DK Barrel and prepare for another Croctopus chase. Swim fast and follow the banana trail to the "N". Now, ascend slowly, another Croctopus is waiting for you, just above your kong heads. Head left, then upwards into the vertical shaft, head right, and into another vertical shaft but note of the crack in the wall to the left found along your way. Press into this wall and you'll get into a secret area, where a 1up balloon, and an Enguarde crate awaits you. Watch out for the Chomps in the bottom right though. Now, with Enguarde, the rest of the chase would be a breeze. Get out of the secret area and move on to the right. Of course, you'll find another Croctopus along the way, but with your excellent speed, he won't be able to catch you, unless of course, if you slow down. There's another Croctopus on the way, who would resume the chase, keep going, know that the next shaft goes right, upwards, left, upwards, left, upwards, and right. Pick the banana along the way, and you can never go wrong.  The next area, is a squidge infested one. Make a way using Enguarde's nose. Head into the exit that's just up ahead. You'll grab the "G" along the way.
Quick OverviewLocation: Ice Age AlleyItems: Red Balloon, Green Balloon, Blue Balloon Walkthrough: You need Expresso to reach the bonus barrel. The spot where you should begin flying hard is just before the Metal Keg. Instead of following the bananas to the keg, fly hard to the right until you reach the hidden land mass where the bonus barrel sits pretty.  In this room, you have the choice to pick among the three items - Red, Green, or Blue balloon. To get the item, just match the items on the three barrels. It doesn't matter which barrel you touch first.
|


